Laser engraving: materials, beam behavior, equipment, and customization
Laser engraving uses focused light to mark or remove material, producing detailed, permanent results on a wide range of substrates. This introduction explains the core principles and practical considerations for anyone exploring laser work, from hobbyist crafting to small-business customization. The following sections cover material choices—especially acrylic—how the laser beam interacts with surfaces, what equipment options exist, common customization workflows, and finishing techniques that influence final quality and durability.
Acrylic and material considerations
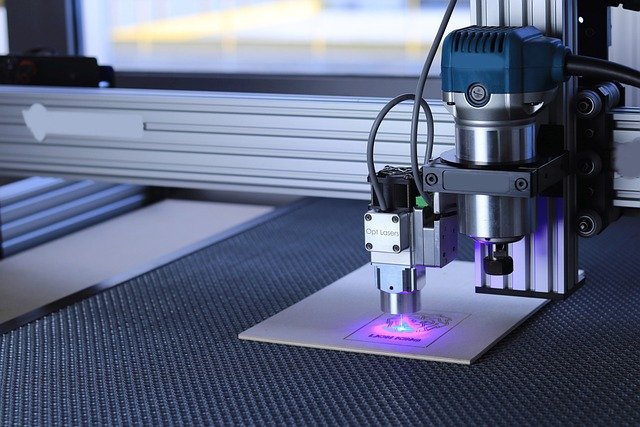
Acrylic is a popular choice for laser engraving because it melts cleanly and produces crisp edges when processed with the right settings. Cast acrylic generally yields a frosted engraved surface that contrasts well with glossy faces, while extruded acrylic tends to produce less consistent engraving depth. Masking the top surface with tape or protective film reduces debris and improves clarity, and testing on scrap pieces is essential to identify the ideal power and speed for a given sheet thickness.
Acrylic releases fumes when cut or engraved, so proper ventilation and filtration are important. Using a local services provider or a well-ventilated workspace with an exhaust system minimizes inhalation risks and prevents residue from building up on optics. Avoid engraving PVC or vinyl, as they emit corrosive chlorine gas that can damage equipment and pose health hazards.
How the beam interacts with materials
The laser beam removes or alters material by concentrating energy in a small area to vaporize, melt, or chemically change the surface. Beam characteristics—wavelength, focus, and pulse behavior—determine how efficiently energy couples into a material. For organic materials and plastics like acrylic, CO2 lasers (wavelengths near 10.6 μm) typically deliver effective absorption and clean engraving results, while fiber lasers (near 1.06 μm) are better suited to metals and certain plastics.
Beam focus controls line width and depth: a tighter focus produces finer detail but shallower cuts, while a defocused beam can engrave larger, softer marks. For high-detail work, adjust focus, choose an appropriate lens, and balance power and speed to avoid charring or excessive melting. Calibration tests using a gradient of power/speed settings help find repeatable engraving parameters.
Equipment types and selection
Equipment ranges from compact, hobby-level diode systems to industrial CO2 and fiber laser platforms. For acrylic and detailed engraving, CO2 laser machines are commonly recommended because their wavelength interacts well with many plastics and wood. Key features to consider include bed size (work area), cooling type (air versus water), exhaust ports, control software compatibility, and available lens options. Rotary attachments enable cylindrical engraving, and honeycomb or slat beds affect smoke evacuation during cutting.
Maintenance and accessory choices impact uptime and output quality: quality optics and regular lens/mirror cleaning preserve beam power; exhaust and filtration lengthen component life; and firmware/software updates improve usability. If you prefer not to buy equipment, local services provide access to larger-format or higher-power systems and expertise for one-off or short-run projects.
Customization workflows and design tips
Customization typically follows these steps: design, material prep, test, engraving, and finishing. Vector artwork (SVG, DXF) is used for cuts and outlines; raster images (PNG, JPG) are used for shaded engravings or photo etching. Convert designs to proper black-and-white or greyscale, set DPI for engraving detail, and use vector paths to define clean cut lines. Consider kerf compensation for parts that must fit together after cutting.
File organization and naming conventions improve repeatability for batch work. For complex projects such as layered acrylic signage, plan for alignment features (tabs, registration marks) and consistent thicknesses. When working with local services, provide material type, thickness, and any protective masking details so their equipment operators can match your intended finish.
Crafting uses and finishing techniques
Laser engraving complements many crafting applications: personalized gifts, jewelry blanks, stencils, model parts, and signage. For acrylic specifically, engraving yields a frosted look that can be backlit or painted for contrast. Common finishing techniques include flame polishing or acrylic-safe solvent polishing for cleaned-cut edges, sanding with fine grit followed by buffing, or filling engraved areas with paint or epoxy to create color contrasts.
Masking, staged passes, and gentle air assist can reduce soot and improve surface quality. Test small pieces to refine finishing steps, and document successful parameter sets for repeated use. For delicate or safety-sensitive items, verify material suitability and post-process cleaning to remove residues before the product is used or handled extensively.
Conclusion
Laser engraving combines precise control of a focused beam with material knowledge and suitable equipment to produce durable, detailed customization across many crafting and production contexts. Understanding how acrylic responds, how beam properties affect results, and which equipment and workflows match your projects helps achieve consistent outcomes. Practical testing, proper ventilation, and routine maintenance are essential elements of a reliable engraving practice.

